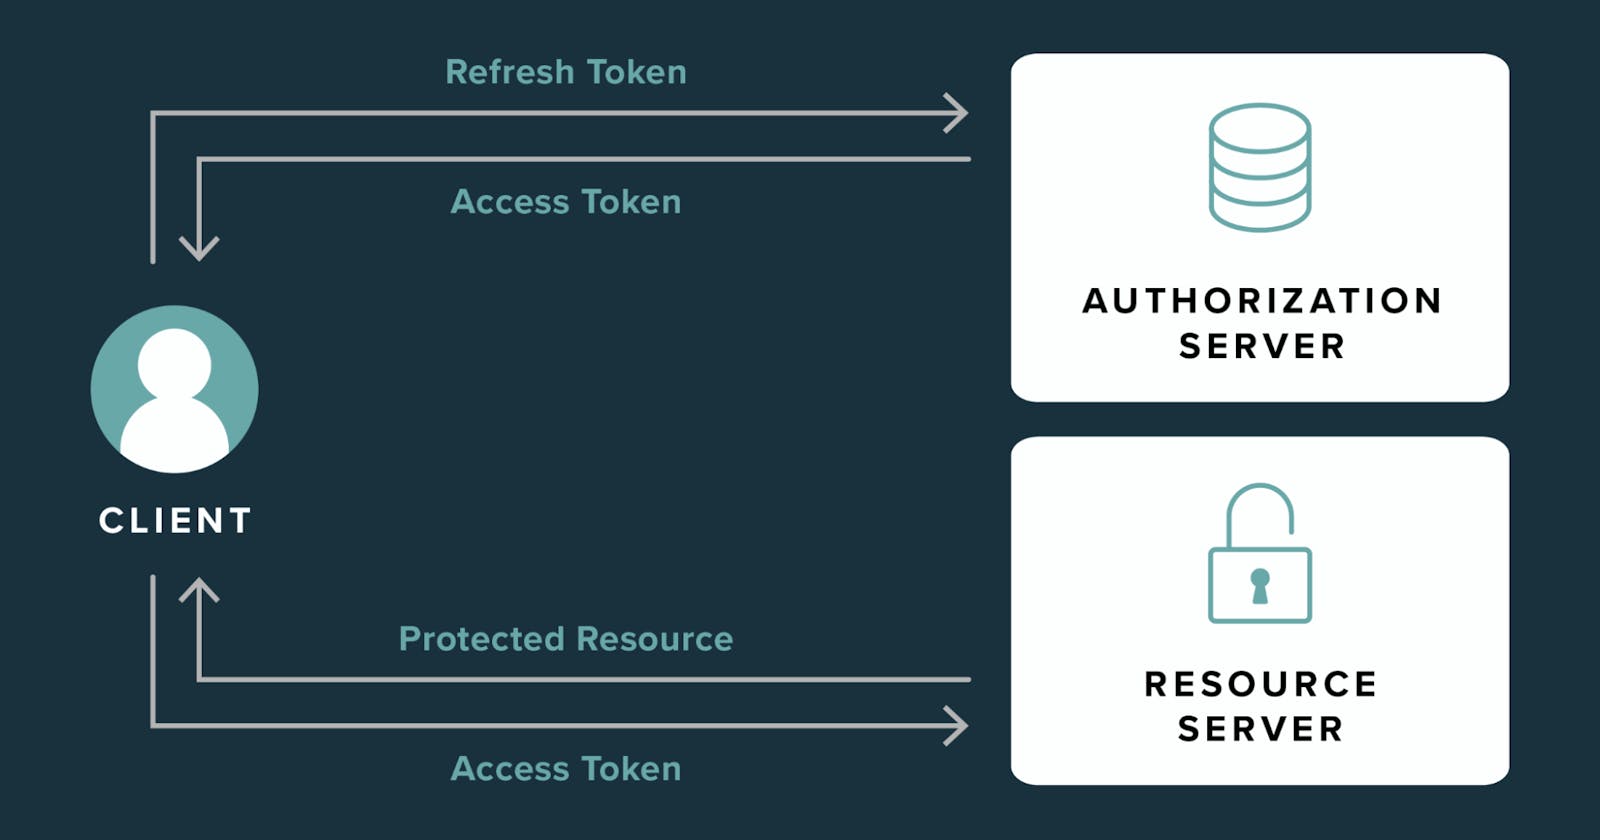
In the context of authentication and authorization in web development, access tokens, and refresh tokens are used to secure and manage access to resources on behalf of a user. These tokens ensure secure communication between a client application and a server.
Access Tokens: Keys to Temporary Authorization
An access token is a short-lived credential used by a client application to access protected resources on behalf of a user.
Access tokens have a limited validity period, typically ranging from minutes to a few hours, to enhance security. Once they expire, the client needs to obtain a new access token to continue accessing protected resources.
It is usually included in the header of HTTP requests to authenticate the client and authorize its access to specific resources.
Refresh Tokens: Powerhouses for Renewed Access
A refresh token is a long-lived credential used to obtain a new access token when the current access token expires.
Refresh tokens have a longer lifespan than access tokens and are kept securely on the client side. They are often used to obtain a new access token without requiring the user to re-enter their credentials
Unlike access tokens, refresh tokens are not sent with each request to access a resource. Instead, they are used to request a new access token from the authorization server when needed.
JavaScript Implementations: Popular Libraries and Best Practices
Third-Party Libraries: Consider well-established libraries like JSON web token for creating and verifying JWT tokens.
Secure Storage: Leverage secure backend storage mechanisms (e.g., databases) for refresh tokens.
HTTPS: Enforce HTTPS for all data transmissions, especially those involving tokens.
Revocation Strategy: Implement a mechanism to revoke refresh tokens upon logout, inactivity, or suspicious activity.
Token Expiration Handling: Employ clear error handling and user-friendly prompts to gracefully manage expired access tokens.
Below is a simplified example of how you might implement the access token and refresh token flow in a Node.js backend using Express and the jsonwebtoken library. Note that in a real-world scenario, you would likely use a more robust authentication library and additional security measures.
const express = require('express');
const jwt = require('jsonwebtoken');

const app = express();
const PORT = 3000;
const express = require('express');: This line imports the Express.js framework, which is a popular web application framework for Node.js.const jwt = require('jsonwebtoken');: This line imports thejsonwebtokenlibrary, which is used for creating and verifying JSON Web Tokens (JWTs).const app = express();: This line initializes an Express application.const PORT = 3000;: This line defines the port number on which the server will listen for incoming requests.
const secretKey = 'your_secret_key';
const accessTokenExpiration = '15m';
const refreshTokenExpiration = '7d';
const secretKey = 'your_secret_key';: This line sets a secret key used to sign and verify JWTs. In a real-world scenario, this should be kept secure and may be stored in environment variables.const accessTokenExpiration = '15m';: This line defines the expiration time for the access token as 15 minutes.const refreshTokenExpiration = '7d';: This line defines the expiration time for the refresh token as 7 days.
const users = [
  { id: 1, username: 'user1', password: 'password1' },
  // Add more users as needed
];
const users = [/* ... */];: This array holds sample user data. In a real application, user data would typically be stored securely, such as in a database. Each user object has anid,username, andpassword.
const authenticateToken = (req, res, next) => {
  const token = req.headers.authorization;

  if (!token) {
    return res.sendStatus(401);
  }

  jwt.verify(token, secretKey, (err, user) => {
    if (err) {
      return res.sendStatus(403);
    }
    req.user = user;
    next();
  });
};
const authenticateToken = (req, res, next) => { /* ... */ };: This middleware function (authenticateToken) is defined to check for a valid access token in the request headers. If the token is valid, it decodes the token and attaches the user information to the request object (req.user). If the token is invalid or missing, it sends an appropriate HTTP status code.
app.post('/login', (req, res) => {
  const { username, password } = req.body;

  const user = users.find((u) => u.username === username && u.password === password);

  if (!user) {
    return res.sendStatus(401);
  }

  const accessToken = jwt.sign({ id: user.id, username: user.username }, secretKey, { expiresIn: accessTokenExpiration });
  const refreshToken = jwt.sign({ id: user.id, username: user.username }, secretKey, { expiresIn: refreshTokenExpiration });

  res.json({ accessToken, refreshToken });
});
app.post('/login', (req, res) => { /* ... */ });: This route handles the login process. It expects a POST request with a JSON body containingusernameandpassword. It checks if the provided credentials match any user in theusersarray. If a match is found, it generates and returns an access token and a refresh token in the response.app.post('/token', (req, res) => { const refreshToken = req.body.refreshToken; if (!refreshToken) { return res.sendStatus(401); } jwt.verify(refreshToken, secretKey, (err, user) => { if (err) { return res.sendStatus(403); } const accessToken = jwt.sign({ id: user.id, username: user.username }, secretKey, { expiresIn: accessTokenExpiration }); res.json({ accessToken }); }); });app.post('/token', (req, res) => { /* ... */ });: This route handles the token refresh process. It expects a POST request with a JSON body containing arefreshToken. It verifies the refresh token, and if valid, it generates and returns a new access token in the response.
app.get('/protected', authenticateToken, (req, res) => {
  res.json({ message: 'Access granted to protected resource', user: req.user });
});
app.get('/protected', authenticateToken, (req, res) => { /* ... */ });: This route is an example of a protected resource. It uses theauthenticateTokenmiddleware to ensure that a valid access token is present in the request headers. If the token is valid, it responds with a JSON object indicating access to the protected resource.
app.listen(PORT, () => {
  console.log(`Server is running on http://localhost:${PORT}`);
});
app.listen(PORT, () => { /* ... */ });: This line starts the Express server and makes it listen for incoming requests on the specified port. It also logs a message to the console indicating the server is running.

